ESXsi Virtualisation Journey VMware vSAN 6.5 Install
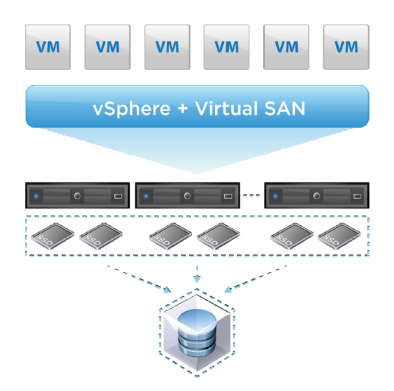
VMware vSAN is an enterprise class, high performance, shared storage solution for Hyper-Converged Infrastructure.
vSAN utilises server attached flash devices and local hard disk drives
to create a highly resilient shared datastore across hosts in a vSphere
cluster. To achieve high availability VMware administrators previously
needed to connect to a SAN, NAS or DAS device, vSAN removes the need for
dedicated external shared storage by adding a software layer that can
leverage local server hardware to provide the same resiliency and
feature set.
Virtual SAN is uniquely embedded within
the hypervisor kernel, directly in the I/O path allowing it to make
rapid data placement decisions. This means that vSAN can produce the
highest levels of performance without taking compute resources, as
opposed to other storage virtual appliances that run separately on top
of the hypervisor. This is by no means a comprehensive guide to VSA, but
an overview of what it does and how to enable it. For further reading
you may want to visit the vSAN 6.5 Documentation Centre, vSAN 6.5 What’s New, or try a hosted evaluation using Hands On Labs. Duncan Epping has compiled a list of all the vSAN resources you’ll need.
Key Features
- Data protection and availability with built in failure tolerance, asynchronous long distance replication, and stretched clusters between geographically separate sites.
- Leverages distributed RAID and cache mirroring to protect data against loss of a disk, host network or rack.
- Minimises storage latency by accelerating read/write disk I/O traffic with built in caching on server attached flash devices.
- Software based deduplication and compression with minimal CPU and memory overhead.
- The ability to grow storage capacity and performance by adding new nodes or drives without disruption.
- VM-centric storage policies to automate balancing and provisioning of storage resources and QoS.
- Fully integrates with the VMware stack including vMotion, DRS, High Availability, Fault Tolerance, Site Recovery Manager, vRealize Automation, and vRealize Operations.
- With iSCSI Access vSAN support physical workloads using iSCSI initiators to eliminate the cost and complexity of a separate physical array.
- Directly connect 2 nodes with cross over cables, for more information see VSAN Direct Connect.
- Full support for vSphere Integrated Containers to run containers for DevOps on vSAN.
- No additional install, appliances, or management interfaces.
Requirements
- VMware vCenter Server 6.5 and ESXi 6.5 hosts.
- A minimum of 3 hosts in a cluster (max 64), however you can work around this by having 2 onsite capacity contributing hosts and one offsite witness host that does not contribute capacity.
- Each capacity contributing host in the cluster must contain at least one flash drive for cache and one flash or HDD for persistent storage.
- SATA/SAS HBA or RAID controller in pass-through mode or RAID 0 mode.
- Minimum of 1 GB NICs but 10 GB is recommended (10 GB required for all-flash).
- All hosts must be connected to a vSAN Layer 2 or Layer 3 network.
- Multicast must be enabled on the physical switches that handle vSAN traffic.
- Both IPv4 and IPv6 are now supported.
- If you are deploying vSAN to your existing hardware and not using the VMware hyper-converged software stack then check the Hardware Compatibility Guide.
- For compatibility with additional VMware products see the Product Interoperability Matrix.
- Before implementing vSAN review Designing and Sizing a Virtual SAN Cluster.
Licensing
vSAN is licensed per CPU, per VM, or per
concurrent user, and comes in three tiers; standard, advanced, and
enterprise. For QoS and stretched clusters you need enterprise
licensing. RAID 5/6 erasure coding, deduplication and compression
require advanced licensing. All other features, including all-flash, are
covered by standard licensing. vSAN licensing can be added on to any
edition of vSphere.
To provide further flexibility and
reduced costs VMware have also introduced Virtual SAN for ROBO;
standadrd and advanced editions sold in license packs of 25 for remote
and branch offices. For more details on vSAN see the vSAN 6.5 Licensing Guide.
vSAN Ports
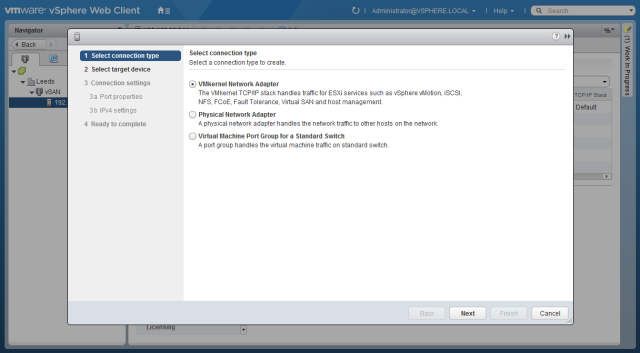
We must first ensure each host in the
cluster is configured with a VMkernel port for use with vSAN traffic. In
the vSphere web client browse to each of the hosts in the designated
cluster for which you intend to use vSAN, open the Configure tab and click Networking. Select VMKernel Adapters, click the Add Host Networking icon. Ensure the connection type is VMkernel Network Adapter and click Next.
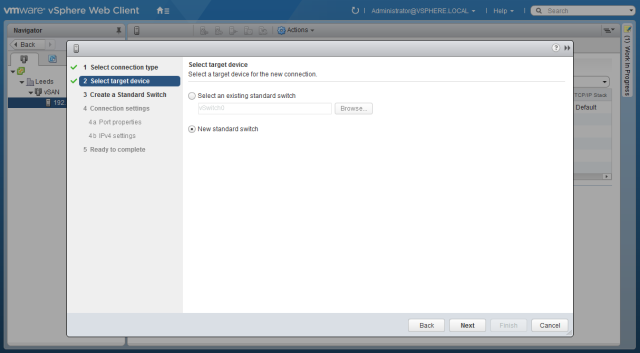
Select a New standard switch and click Next.
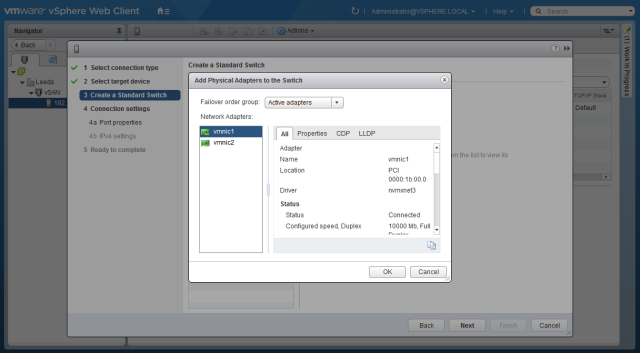
Assign physical adapters to the switch
using the green plus symbol. For production environments make sure
multiple physical network adapters are assigned for redundancy. When you
have finished the network adapter configuration click Next.
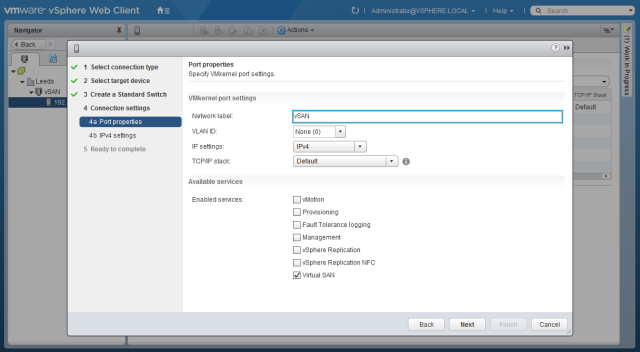
Configure a name for the VMkernel port and a VLAN ID if required. Ensure Virtual SAN is selected under enabled services and click Next.
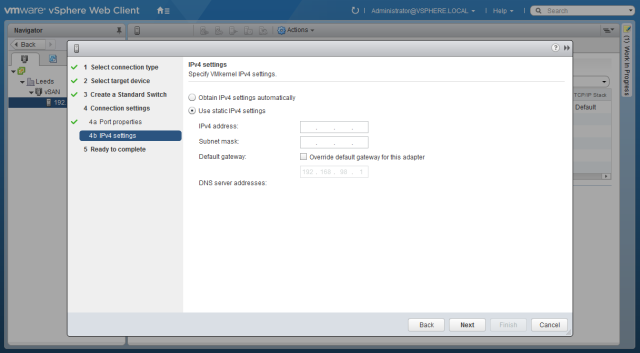
Configure the network settings for the VMkernel port and click Next.
On the Summary page click Finish.
For lab environments with limited physical interfaces you select the Management Network and click the Edit Settings icon. Add Virtual SAN traffic to the list of available services and click Ok. The vSAN traffic will now share the management network, this is obviously not recommended for production workloads.
vSAN Configuration
There is no additional software
installation required for vSAN as the components are already embedded in
the hypervisor. All we need to do is enable the required features from
the vSphere web client (vSAN is not yet supported in the HTML5 client).
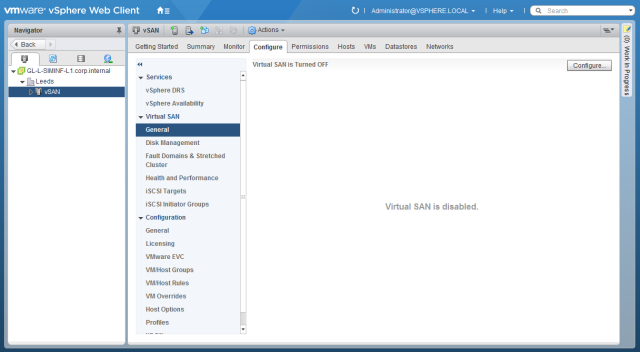
To enable vSAN browse to the appropriate cluster in the vSphere web client and click the Configure tab. Expand Virtual SAN and select General, you will see a message that Virtual SAN is not enabled, so click Configure.
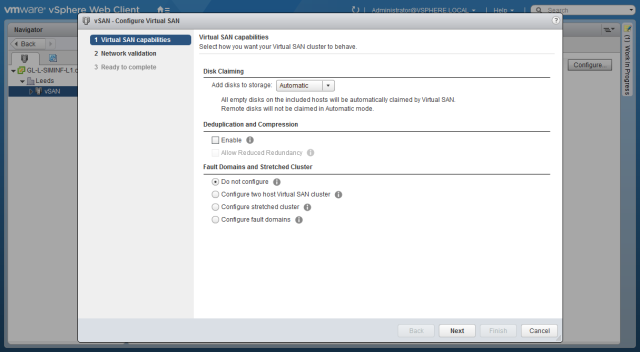
By default any suitable disks will be added to the vSAN datastore. To manually select disks change the disk claiming setting to Manual. Review the other capability options by hovering over the grey information circle, select any appropriate features and click Next. If you change any settings on the capabilities page additional menu pages will be added for configuration of these settings.
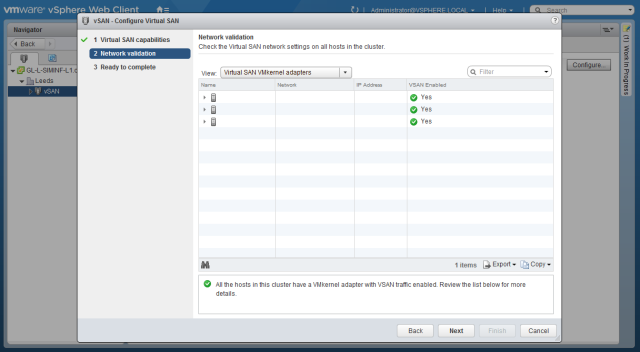
Review the details on the summary page and click Finish.
The virtual SAN will now pool the selected resources into the vSAN
datastore and you can start provisioning machines right away. vSAN
creates and presents a single datastore containing all disks for each
vSphere cluster. You can amend vSAN settings or add additional
capabilities at a later date using the menu options under the Virtual SAN heading of the Configure tab of a vSphere cluster.


Comments
Post a Comment