Migrating Windows vCenter Server to VCSA 6.5
his post gives a walkthrough on migrating
from a Windows based vCenter Server (VCS) to the Photon OS based
vCenter Server Appliance (VCSA). This guide is specific to migrating and
upgrading from vCenter Server 5.5 or 6.0 to VCSA 6.5. If you are
looking to migrate from vCenter Server 5.5 to VCSA 6.0 then see Migrating Windows vCenter Server to VCSA 6.0, or to deploy a new VCSA review the vCenter Server Appliance 6.5 Install Guide.
About VCSA


About VCSA
The VCSA is a pre-configured virtual appliance; as of v6.5 the operating environment is built on Project Photon OS
1.0. Since the OS has been developed by VMware it benefits from
enhanced performance and boot times over the previous Linux based
appliance. Furthermore the embedded Postgre database means VMware have
full control of the software stack, resulting in significant
optimisation for vSphere environments and quicker release of security
patches and bug fixes. The VCSA scales up to 2000 hosts and 35,000
virtual machines.
In vSphere 6.0 the VCSA reached feature
parity with its Windows counterpart, 6.5 begins to pave the way for VCSA
to become the preferred deployment method for vCenter Server. One key
addition is the inclusion of Update Manager bundled into the VCSA, as
well as vCenter High Availability, Backup and Restore, and other features. The appliance also saves operating system license costs and is quicker and easier to deploy and patch.
Migrating to VCSA involves the deployment
of a new appliance and migration of all configuration (including
distributed switches) and historical data using the upgrade installer.
The VCSA uses a temporary IP address during migration before switching
to the IP and host name of the VCS, the Windows box is then powered off.
Last year there was a fling
for migrating to VCSA which had limited capability and support. If you
have used or read about the fling then re-review any limitations as a
lot of this has been lifted now that VMware have released the migration
tool as an official product. Furthermore in vSphere 6.5 the migration
tool is not built into the single installation package alongside
install, upgrade, and restore.
Software Considerations
- The Windows VCS must be v5.5 or v6.0 (any build / patch) to migrate to VCSA 6.5. If the VCS is v5.0 or 5.1 upgrade to 5.5 first and then migrate. Both physical and virtual vCenter Server installations are compatible.
- Any database, internal or external, supported by VCS 5.5 can be migrated to the embedded Postgre database within the target VCSA.
- The ESXi host where VCSA will be deployed must be v5.5 or above, as must all other hosts in the vCenter.
- The Windows server is powered off once the VCSA is brought online, this means any other components, VMware or third party, need to be migrated off the Windows server in advance or they will no longer work (don’t forget to move and update any scripts that may live on the Windows server).
- If you are using Update Manager the VCSA now includes an embedded Update Manager instance from v6.5.
- You must check compatibility of any third party products and plugins that might be used for backups, anti-virus, monitoring, etc. as these may also need upgrading for use with vSphere 6.5.
- For other VMware products check the Product Interoperability Matrix.
Hardware Considerations
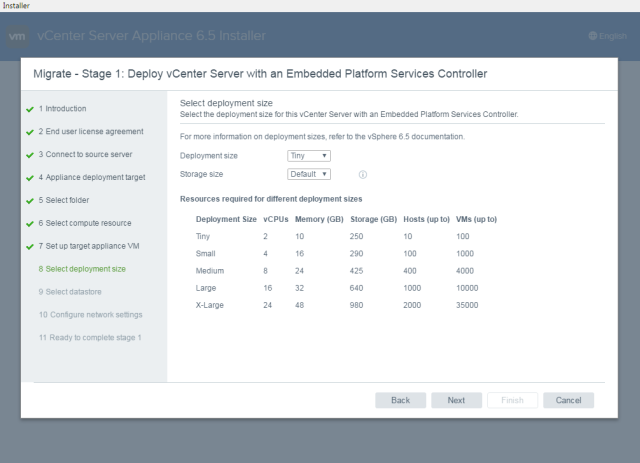
- The VCSA with embedded PSC requires the following hardware resources (disk can be thin provisioned)
- Tiny (up to 10 hosts, 100 VMs) – 2 CPUs, 10 GB RAM.
- Small (up to 100 hosts, 1000 VMs) – 4 CPUs, 16 GB RAM.
- Medium (up to 400 hosts, 4000 VMs) – 8 CPUs, 24 GB RAM.
- Large (up to 1000 hosts, 10,000 VMs) – 16 CPUs, 32 GB RAM.
- X-Large (up to 2000 hosts, 35,000 VMs) – 24 CPUs, 48 GB RAM – new to v6.5.
- Storage requirements for the smallest environments start at 250 GB and increase depending on your specific database requirements. See the Storage Requirements document for further details.
- Where the PSC is deployed as a separate appliance this requires 2 CPUs, 4 GB RAM, 60 GB disk.
- Environments with ESXi host(s) with more than 512 LUNs and 2048 paths should be sized large or x-large.
- To help with selecting the appropriate storage size for the appliance calculate the size of your existing VCS database here.
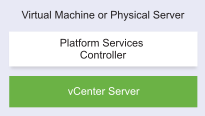
Architectural Considerations
- From vSphere 6 onwards the Platform Services Controller (PSC) was introduced to the vSphere architecture. The PSC contains infrastructure services such as Single Sign On, Certificate Authority, licensing, etc. The PSC is deployed internally with vCenter Server or as an external component.
- You can read more about the PSC in this KB.
- When implementing a new vSphere 6.5 environment you should plan your topology in accordance with the VMware vCenter Server and PSC Deployment Types. Larger environments may require an external PSC.
- The migration tool supports different deployment topologies but does not, and can not, make changes to the topology and SSO domain configuration.
- If SSO was installed on the same machine as vCenter Server then services are migrated to vCenter Server Appliance 6.5 with embedded Platform Services Controller.
- If SSO was installed on a different machine from vCenter Server then the Windows VCS server will be migrated to the vCenter Server Appliance 6.5 with external Platform Services Contoller, and the Windows SSO server will be migrated to the Platform Services Controller 6.5 Appliance.
- In this post we will be migrating a Windows vCenter using the embedded deployment model.
- Consider if the default self-signed certificates are sufficient or if you want to replace with custom CA or VMware CA signed certs, see Installing vCenter Internal CA signed SSL Certificates for more information.
Other Considerations
- Variables such as FQDN resolution, database permissions and access to the licensing portal should all be in place since we are upgrading an existing vCenter solution.
- All vSphere components should be configured to use an NTP server. The installation can fail or the vCenter Server Appliance vpxd service may not be able to start if the clocks are unsynchronized.
- The ESXi host on which you deploy the VCSA should not be in lockdown or maintenance mode.
- You will need the SSO administrator login details and if the Windows VCS service runs as a service account then the account must have replace a process level token permission.
- Local Windows users that have vSphere permissions are not migrated since they are specific to the Windows server, all SSO users and permissions are migrated.
- If there are any firewalls between vSphere components then review the list of required ports here., e.g. data migration from the VCS to the VCSA uses SSH so port 22 must be open.
- The upgrade can be easily rolled back by following this KB.
- Migration of vCenter using DHCP, or services with custom ports, is not supported. The settings of only one physical network adapter are migrated.
- Downtime varies depending on the amount of data you are migrating, but can be calculated using this KB.
- Ensure you have a good backup of the vCenter Server and the database.
- Official resources – vSphere 6.5 Documentation Centre, vSphere 6.5 Release Notes. Update – there is now a vCenter Server Appliance migration VMware blog here and walkthrough here.
- Read the Important information before upgrading to vSphere 6.5 KB.
Process
Before we begin if your existing Windows
vCenter is virtual it may be beneficial to rename the vCenter virtual
machine name in the vSphere inventory to include -old or equivalent.
While the hostname and IP are migrated the vSphere inventory name of the
VM cannot be a duplicate. The old server is powered down but not
deleted so that we have a back out.
Download the VMware vCenter Server Appliance 6.5 ISO from VMware downloads: v6.5.0 | v6.5.0 U1.
Unlike the Windows vCenter installer, which hasn’t changed much in
v6.5; the VCSA installer has had a complete overhaul. You’ll notice
straight away that the GUI is much cleaner, and multiple deployment
options (install, upgrade, migrate, restore) are now bundled into one
installer.
Mount the ISO on your computer. The VCSA 6.5 installer is compatible with Mac, Linux, and Windows. Copy the migration-assistant
folder to the Windows vCenter Server (and SSO server if separate). If
SSO is running on a different Windows server then you must run the
Migration Assistant on the SSO server first and migrate following the
instructions below, then complete the same process on the Windows
vCenter Server.
Start the VMware-Migration-Assistant and enter the SSO Administrator credentials to start running pre-checks.
If all checks complete successfully the Migration Assistant will finish at ‘waiting for migration to start’.
On a different machine from your Windows vCenter and SSO server(s) open the vcsa-ui-installer
folder file located on the root of the ISO. Browse to the corresponding
directory for your operating system, e.g. \vcsa-ui-installer\win32.
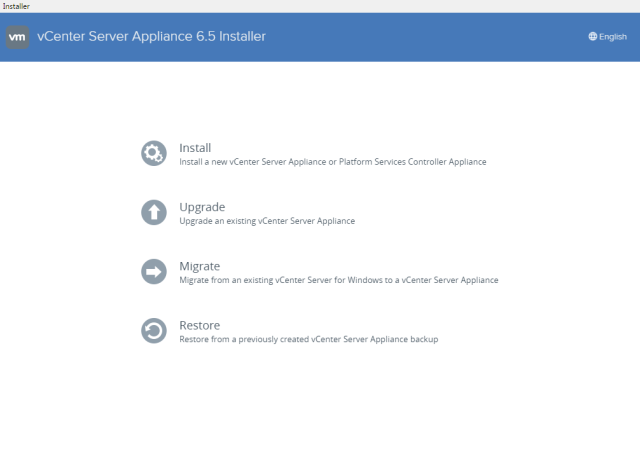
Right click Installer and select Run as administrator. The vCenter Server Appliance Installer will open, click Migrate.
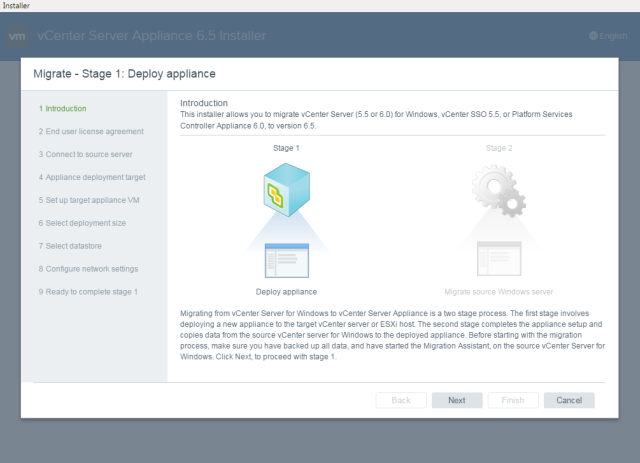
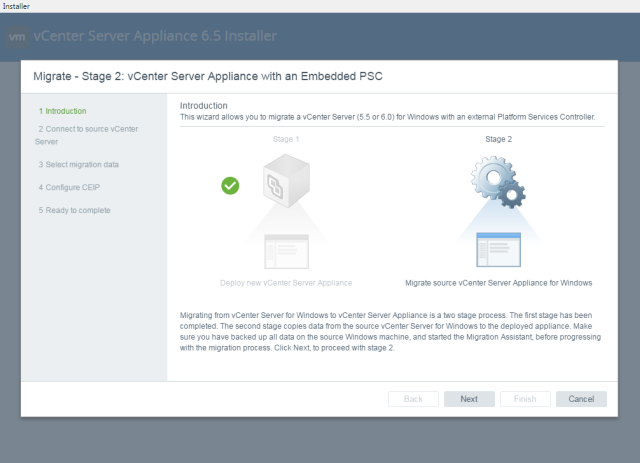
The migration is split into 2 stages;
stage 1 deploys the new appliance with temporary network settings, there
is no outage to the Windows vCenter. Stage 2 migrates data and network
settings over to the new appliance and shuts down the Windows server. We
begin with deploying the appliance. Click Next.
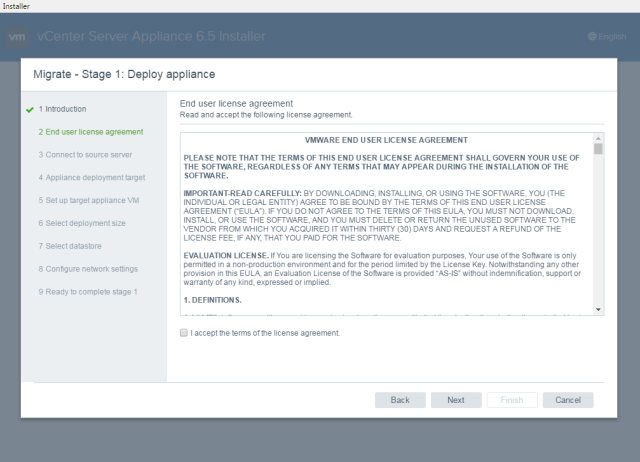
Accept the license terms and click Next.
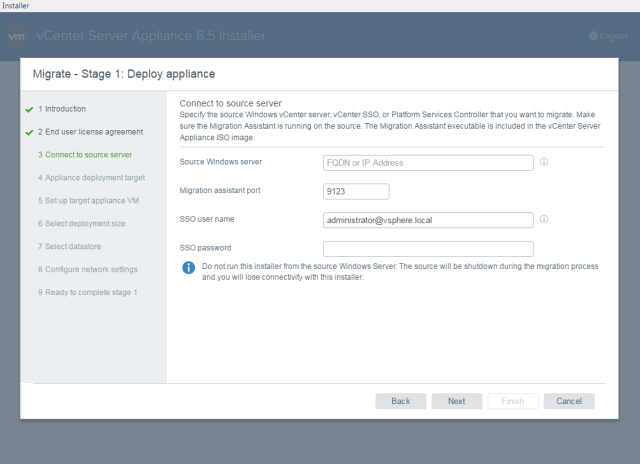
Enter the details of the vCenter Server to migrate, then click Next.
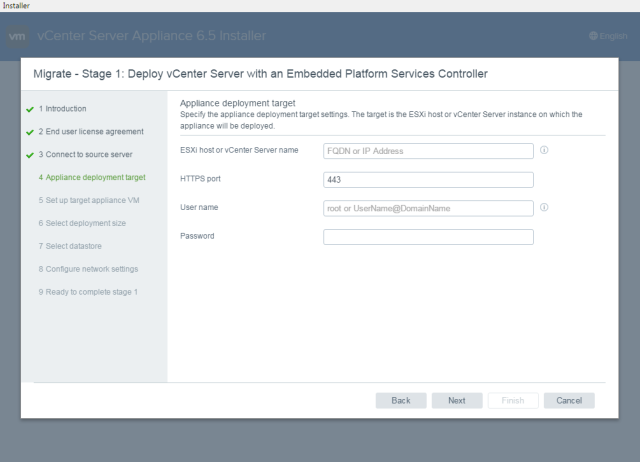
Enter the FQDN or IP address of the host,
or vCenter upon which you wish to deploy the new VCSA. Enter the
credentials of an administrative or root user and click Next. The installer will validate access, if prompted with an untrusted SSL certificate message click Yes
to continue. Tip – connect to the vCenter for visibility of any
networks using a distributed switch, connecting to the host direct will
only pull back networks using a standard switch.
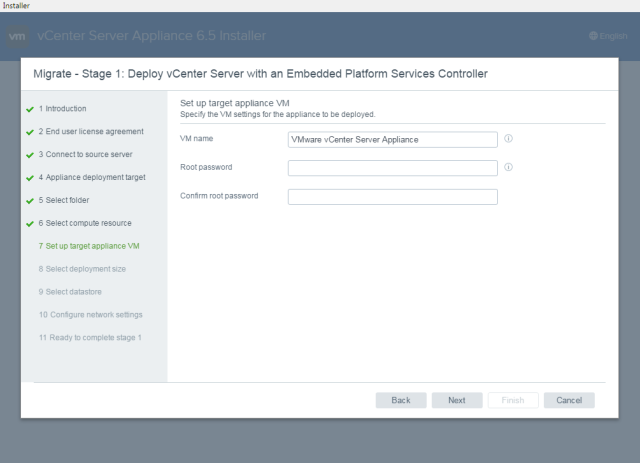
Enter the virtual appliance name, this is
the name that appears in the vSphere inventory as mentioned earlier.
The host name of the vCenter Server will automatically be migrated.
Click Next.
Select the appropriate deployment size for your environment and click Next.
Select the datastore to locate the virtual appliance and click Next.
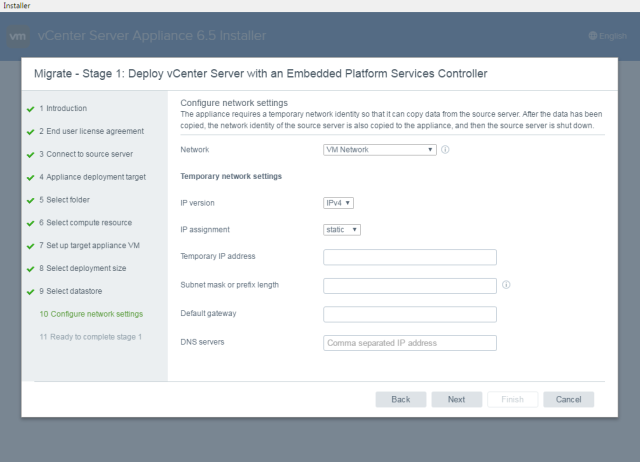
Configure the temporary network settings for the appliance. These will
only be used during migration of the data, once complete the temporary
settings are discarded and the VCSA assumes the identity, including IP
settings, of the Windows vCenter Server. Click Next.
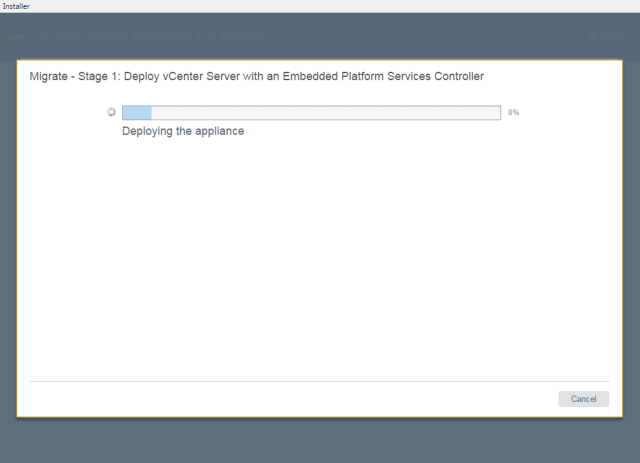
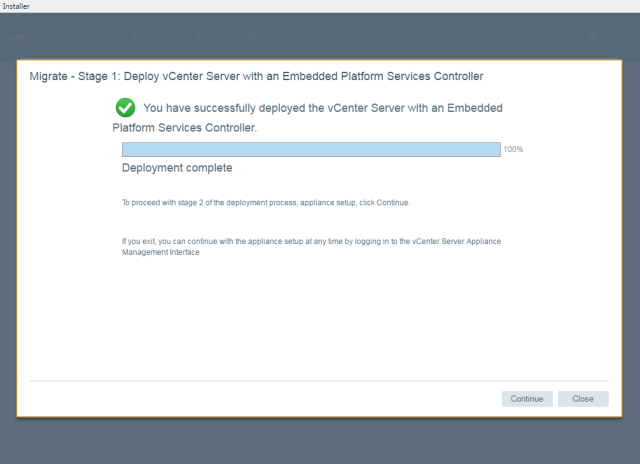
Review the settings on the summary page and click Finish. The VCSA will now be deployed.
Once complete click Continue to being the second stage of the migration.
Click Next to begin the migration wizard.
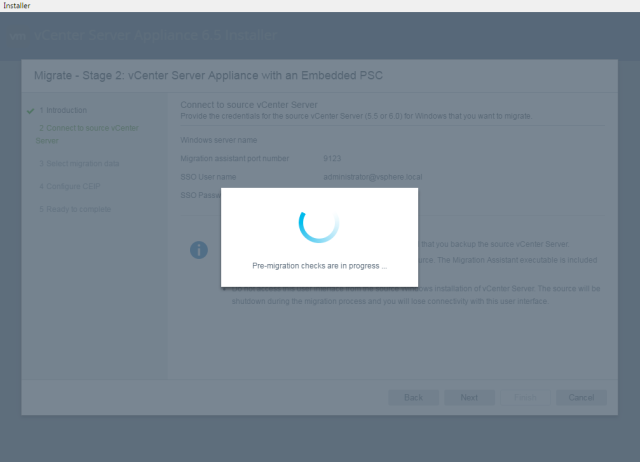
The source vCenter details are imported from stage 1.
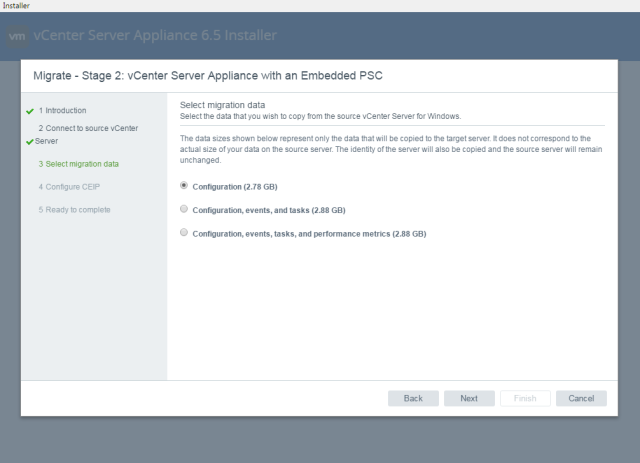
Select the data to migrate and click Next.
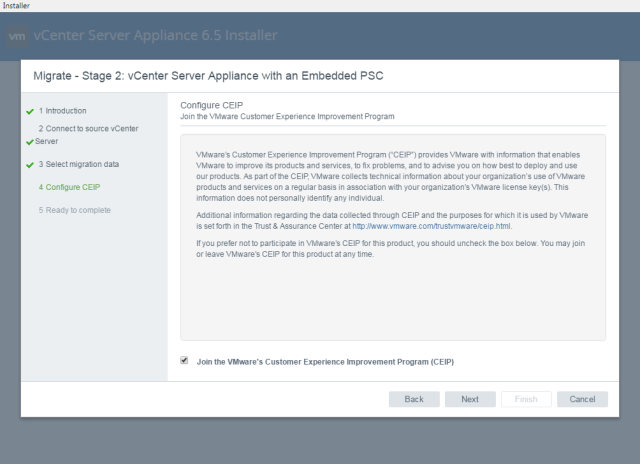
Select whether or not to join the VMware Customer Experience Improvement Program and click Next.
Review the summary page and click Finish.
Data will now be migrated to the VCSA, once complete the Windows
vCenter Server will be powered off and the network settings transferred
to the VCSA. If you urgently need to power back on the Windows server to
retrieve files or such like, then do so with the vNICs disconnected,
otherwise you will cause an IP/host name conflict on the network.
Post-Installation
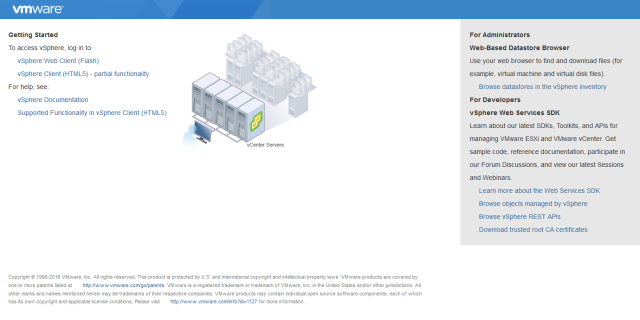
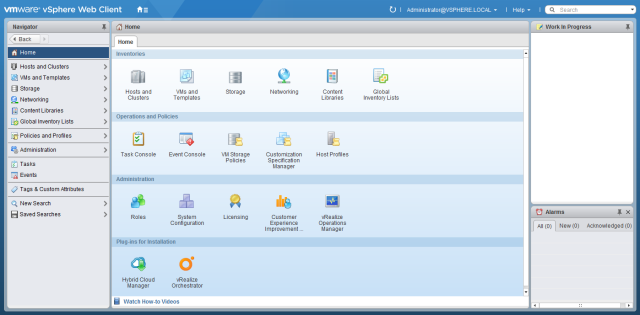
Connect to the vCenter post install using the IP or FQDN of the vCenter. Access vSphere by clicking either the vSphere Web Client (Flash) or the vSphere Client (HTML5). Connect to the vSphere Web Client to manage your system, the thick client (Windows) is no longer supported.
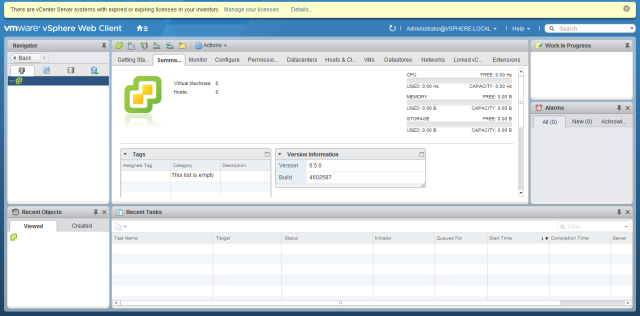
Log in to the vSphere Web Client using the SSO administrator login. Verify the installed version is correct under the Summary tab when selecting the vCenter, you can also go to Help > About.
You must apply a new vCenter license key within 60 days. From the Hosts and Clusters view select the vCenter Server. Click Actions and Assign License. Select a license or use the green plus button to add a new license and click Ok.


Comments
Post a Comment