vSphere Data Protection (VDP) 6.1 was released in September 2015. The
release fixes various defects in the 6.0 release; the full release
notes can be found here. I wrote about the updates to VDP in vSphere 6.0 back in July, and reading that article
might be a good primer for this one. In this tutorial, I'm going to
walk through deploying VDP 6.1, the initial configuration and creation
of an image-level backup.
I'll begin by deploying the VDP 6.1 appliance, which is downloaded
as an OVA file. Deploying an OVA is outside the scope of this article,
but the VMware documentation has a simple walk-through. There are a few things that need to be in order prior to beginning:
Have an IP address handy to use when prompted by the wizard.
Create a DNS entry ahead of time, and use nslookup to be sure that forward and reverse lookup are functioning correctly.
Ensure enough capacity is available on the datastore where backups will reside.
Determine how many appliances will be needed. A single VDP
appliance can support to up 400 VMs, and up to 20 VDP appliances can be
deployed in a single vCenter. Also consider the backup window; a single
VDP appliance can back up eight virtual machines (VMs) simultaneously,
and by using a few external proxies, up to 24 VMs can be backed up
simultaneously.
Once the minor prerequisites are in order, deploy the appliance.
Provide all the pertinent information in the deployment wizard, and the
basic settings such as IP address and hostname will be configured
automatically. Once the VM is deployed and initial customization is
complete (this process can be observed from the VM console), the
appliance can be configured from a nice, clean Web interface. Access the
Web interface at https://<VDP appliance>:8543/vdp-configure,
where you'll see a login screen for the appliance configuration.
Housekeeping
The initial credentials are the username root, with password changeme.
Once successfully logged in, you'll be presented with a configuration
wizard. Here you'll confirm IP address settings, set the time zone,
connect to a vCenter server, select the datastore where the VDP storage
will be created, and the size of the appliance. The walk-through of this
wizard is self-explanatory, as well. Note that using the Test
Connection button is required before moving forward. Get Storage Right
At the end of the wizard is an important screen. On the Ready to
Complete page, be sure to check the box that says "Run performance
analysis on storage configuration." The entire backup experience moving
forward will be painful and frustrating if storage performance is too
poor. For this reason, it's always advisable to confirm that storage
performance is adequate up front.
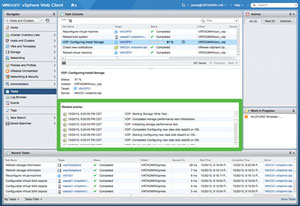
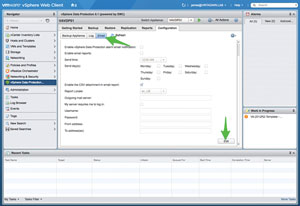
With that option selected, a test that runs for 30 minutes or more
will be started and it will thoroughly evaluate the storage that's been
configured. In my case, the VDP wizard had a little glitch and I wasn't
able to watch the test run. Figure 1 shows how I was able to see the
status of the running tests through the vSphere Web Client, however.
[Click on image for larger view.]Figure 1. Observing the storage performance test in the vSphere Web Client.
Once the test is complete, the appliance will reboot if that option
was selected. During this reboot, more configuration will take place. Be
patient here; it takes quite a long time. The official documentation
says that shutting down and starting up a VDP appliance can take up to
30 minutes, and that has certainly been my experience.
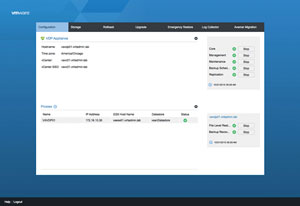
Once the appliance is back up, navigating to the VDP configuration
page again and logging in with the new credentials yields a nice status
page, where all the running services can be monitored and appliance
settings can be confirmed (see Figure 2). When confirming VDP settings,
ensure that NTP settings are not changed or configured. VDP uses VMware
Tools to synchronize time, and configuring NTP will cause
time-synchronization errors and strange behavior.
[Click on image for larger view.]Figure 2. VDP Configuration Status screen.
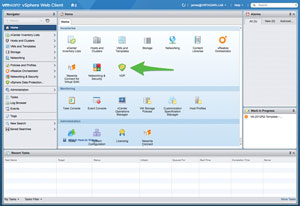
Now that initial configuration is complete, the VDP appliance can be
primarily managed from the vSphere Web Client. Logging in to the Web
Client with Administrator permissions will now show a VDP icon on the
Home screen. It can also be accessed from the Navigator on the left side
of the screen. Figure 3 shows the newly created VDP section of the
vSphere Web Client. Configuration of backup jobs, backup replications
and restores will be performed from here. Click on the VDP icon to get
started setting up some jobs.
[Click on image for larger view.]Figure 3. VDP icon on the Home screen of vSphere Web Client.
Backup Considerations
There are two important configurations to make from the Configuration
section before setting up the backup jobs. The first is to set the
maintenance window for backups, and the second is to configure e-mail
settings alerting you that the system can send notifications about
backup jobs.
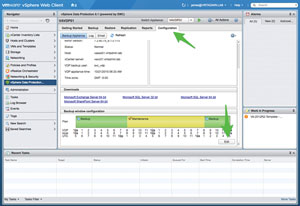
Figure 4 shows where to set the maintenance window, which is simple
and intuitive, while Figure 5 shows the e-mail settings. I bounce mine
off my Google Apps account, but many organizations would use an internal
mail relay for this.
[Click on image for larger view.]Figure 4. Setting the backup window from the vSphere Web Client.
[Click on image for larger view.]Figure 5. Setting the e-mail notification settings from the vSphere Web Client.
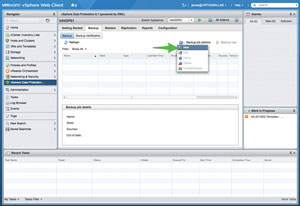
Now that the global policies are set, a backup job can be created.
I'll will show an image-level (VM) backup. To launch the new backup job
wizard, go to the Backup tab of the VDP area and select Backup job
actions | New (see Figure 6).
[Click on image for larger view.]Figure 6. New backup job wizard in the vSphere Web Client.
Walk through the configuration wizard, selecting the following options:
Job Type: Guest Images
Data Type: Full Image
Backup Sources: Select clusters, resources pools, or VMs
Schedule: Create a schedule (for my example, I used Daily at 21:00)
Retention Policy: Choose retention settings (I chose 7 dailys, 4 weeklys, 12 monthlys, and 1 yearly)
Job Name: Name the job
Ready to Complete: Review and hit Finish
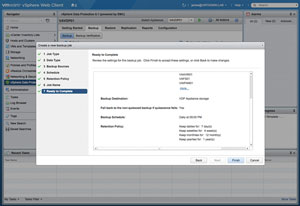
Upon completion of this wizard, shown in Figure 7, the job is ready
to run. Because e-mail notifications have already been set up, this job
is all set. Either start the job manually or wait for the first
scheduled job to run. Assuming the backup window is large enough for all
the selected VMs to complete in time, this type of job is generally
successful out of the gate.
[Click on image for larger view.]Figure 7. Ready to Complete section of the VDP New backup wizard.
Recently I encountered an issue where Avamar failed to take backup. Logs stating insufficient Permission in the host OS 2018-02-19 06:59:56 avvcbimage Error <0000>: [IMG0008] Failed to connect to virtual disk [VMAXDS] VM/VM-000002.vmdk (3014) (3014) Insufficient permissions in the host operating system (Log #2) We verified the permission on the vCenter but no luck,However on demand backup from local Account is with same level of access is successful. While investigation further we found that there are errors related to DNS, and even some DNS server are getting backed up via avamar. We asked to remove DNS from Avamar back considering VM stun operation during the backup but it did not help to resolve the issue. Later on we found that DNS server which is hardcoded in Avamar was decommission due which Domain ID's were unable to run backup on vCenter
his is my Second blog in the Series of vRealize Operations Manager a.k.a vRops . We will learn how to configure the vROps Appliance and integrate with your infrastructure. For Reading the deployment of the vROps . vRealize Operations Manager (vROps) 6.2 Deployment– Step-by-Step : Part-1 Before Going Through need to keep in mind that like vCops, vRops is also having the UI and ADMIN console. For both URL’s they have different use cases. UI Console gives you access to manage your environment (Add/Remove etc.) Monitor the health risk and lets you explore all the other features here. Even ADMIN console having the very limited but holding big responsibility like System Staus, software update and Support etc. So we will keep in touch with both of them in this part. ADMIN URL : https://fqdn or ip of your vrops appliance/admin/ UI URL : https://fqdn or ip of your vrops appliance/ui/ or just entering the FQDN or IP will...
To find the ESXi install date you should follow the below steps Find the System UUID by running one of the following commands: esxcfg-info | grep -i UUID You’ll get an output similar to: esxcfg-info | grep -i “\\-System UUID” You’ll get an output similar to: esxcli system uuid get Convert the first 8 hexadecimal characters to decimal format using calculator or e.g. this online converter. In my case the hexadecimal characters 54aedcc8 translates to decimal numbers 1420745928 Use e.g. this Epoch to convert the decimal numbers to a date. In my case the decimal numbers 1420745928 translates to Thu, 08 Jan 2015 19:38:48 GMT


Comments
Post a Comment